I just love Candi!
A few Candi ideas.....
Candi flowers – Dahlia
You will need:
2 x 3cm circles
Candi – approx 20 – 26
Candi fix
Silicone glue
Instructions: Dahlia
· Cut 2 light card circles approx 3cm in diameter for the base of flower
· Fold one in half and apply adhesive to one half
· Stick two circles together so that unglued half gives you something to hold whilst making flower
· Apply candi fix to 10-12 candi
· Stick candi around the outside of circle making sure to maintain a nice round shape
· Take 10-12 candi and fold in half giving a good pinch to emphasise fold
· Taking circle with candi around outside, apply a thick layer of silicone glue around inside circle close to edge of candi
· Taking folded candi start to build inside layer of flower by placing candi, folded point and open side of candi down into silicone. Keep as close together as possible maintaining a nice circle
· When all in place (will take 10-12 candi) use index finger to level nicely into place, this should give just enough space for a nice candi centre
· Take 2 candi and sandwich together, right side out, with a candi fix between. Place a nice blob of silicone in the centre of flower to give some height to the centre and place candi centre on top (you could use to candi fix, one on top of the other, instead of silicone)
· When glue is dry the unglued half of the circle at the back can be finished off by gluing down for a flat backed flower, left loose for a more 3D effect when applying to card or scrapbook page or can also be used to hide a cocktail stick before gluing in place and this will make a great cupcake pick.
Instructions: Lotus
You will need:
2 x 3cm circles
Candi – approx 20 – 26
Candi fix
Silicone glue
(not suitable for foiled candi as insides are white, no reason not to have outside petals foiled though!!)
· Cut 2 light card circles approx 3cm in diameter for the base of flower
· Fold one in half and apply adhesive to one half
· Stick two circles together so that unglued half gives you something to hold whilst making flower
· Apply candi fix to 10-12 candi
· Stick candi around the outside of circle making sure to maintain a nice round shape
· Take 10-12 candi and fold in half inside out (i.e. if you have dotty candi make sure dots are on inside of petal when folded) giving a good pinch to emphasise fold
· Taking circle with candi around outside, apply a thick layer of silicone glue around inside circle close to edge of candi
· Taking folded candi start to build inside layer of flower by placing candi, folded point down into silicone with open side of petal facing up. Keep as close together as possible maintaining a nice circle
· When all in place (will take 10-12 candi) use index finger to level nicely into place, this should give just enough space for a nice candi centre
· Take 2 candi and sandwich together, insides out, with a candi fix between, this will give a nice ‘cup’ like centre that can be filled with a pearl, gem, or liquid pearl dots. Place a nice blob of silicone in the centre of flower to give some height to the centre and place candi centre on top (you could use to candi fix, one on top of the other, instead of silicone)
· Place pearl, gem or liquid pearl in the centre to finish
· When glue is dry, the unglued half of the circle at the back can be finished off by gluing down for a flat backed flower, left loose for a more 3D effect when applying to card or scrapbook page or can also be used to hide a cocktail stick before gluing in place and this will make a great cupcake pick.
having a bit of a 'blue' moment when crafting!
Just love these colours from Craftwork Cards, the blues are so fresh and alive and sooooooooo classy!
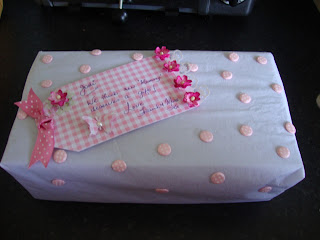
Candi Wrap...
Couldn't find any wrapping paper suitable for a girlie gift without going shopping so used some crisp white tissue and dotted it with Craftwork Cards pink dotty candi. It went down a treat and I think it looked really cute!
Mars x
Mars x
been baking and crafting lots!
Chocolate with raspberry & chambourd meringue buttercream / chocolate with Baileys & dark chocolate - yummy!!
Vanilla & ground almond cupcakes with vanilla meringue buttercream.......
Subscribe to:
Comments (Atom)


